Today's Recipe
An easy dish for when guests drop by. more people easy just add more pasta.
Ingredients
300 g pasta
1 tablespoon olive oil
2 chicken breasts cut into bite-sized pieces (approximately 2 chicken breasts)
Salt and pepper to taste
1 medium red onion finely diced
1 red capsicum diced
2 chorizo diced or sliced your choice.
2 cloves garlic crushed or grated
400 g tin chopped tomatoes
10 g basil plus extra for garnish (optional)
Parmesan or cheddar grated (optional)
Let’s get Cooking
Cook the pasta according to packet instructions / your own preferences. Drain immediately when cooked to your liking.
Meanwhile, heat the olive oil in a large frying pan over a high heat for 1 minute. While the oil is heating up, season the diced chicken with a little salt and pepper.
Fry the chicken in the frying pan for 3 minutes, or until lightly browned, turning occasionally to ensure most surfaces are browned.
Tip the chicken onto a plate and return the pan to the heat.
Turn the heat down to low and add the diced red onions, red capsicum and chorizo. Fry for 4 minutes, or until the onions are softened.
Add the garlic and fry for 1 more minute on low.
Add the chopped tomatoes together with the cooked chicken. Turn up the heat and bring to the boil, then turn the heat right down and simmer for 5 minutes. When the 5 minutes are up. Turn the heat off completely.
Finally, tip the pasta into the sauce and turn the pasta in the sauce until it is well coated.
Rip up the basil and stir it into the pasta.
Serve garnished with more basil – on its own or with grated cheese.
Pepare Cake
Paria cake or Pepare cake is typical of the city of Banjarmasin. The shape of the cake is similar to the bitter melon vegetable, hence the name bitter melon cake or pepare. Steamed potatoes will be added to the dough, so that the dough is thick and soft when bitten. For the green colour, use pan-dan juice and a few drops of green colouring. The pan-dan aroma is strong, and when you eat it, the pan-Dan taste is just right. For 100% coconut sugar, we use Javanese sugar, so the taste and aroma are unique.
Today traditional regional cakes are rarely seen outside of big holidays or the lead up to special events such as Ramadan, so my search for such items has been difficult. However we happened to stop by a local eatery in Banjarmasin to try another local dish and here they we selling Pepare Cakes.
This cake had my interest as when I read about the ingredients it used mashed potato. Apart from the green colour they have such an unusual shape, and I was curious as to how it was achieved. In fact it is quite a simple recipe and the shape is easily obtained. But what I can say is they should be availe all of the time as they are absolutely delicious.
Ingredients
250 gr sticky rice flour
150 gr steamed potatoes (mashed)
50 ml pandan juice (thick)
150 ml warm water
1/2 tsp salt
2 drops green colouring
30 ml vegetable oil
Other Ingredients
vegetable oil
Coconut Filling Ingredients
200 gr half old coconut (grated)
150 gr brown sugar (comb)
100 ml water
3 pandan leaves (bunch)
1/4 tsp salt
Let’s get Cooking
In a bowl stir together the sticky rice flour, steamed potatoes and salt. Add pandan juice and warm water slowly. Knead until smooth and the dough can be formed.
Take the dough and fill it with coconut. Shape it oval and make streaks with a toothpick like bitter melon skin. Line the cake with banana leaves, and brush the top of the cake with vegetable oil. Do this until the dough runs out.
Heat the steamer, cover the pan and cover it with a clean cloth. Steam the papare for about 15 minutes or until cooked. Occasionally open the lid of the pan, so that the shape of the cake doesn't melt.
Once cooked, remove the cake and brush again with vegetable oil. Use vegetable oil, apart from making it shiny, when at room temperature the surface of the cake does not harden.
Coconut filling
In a pan, cook water, brown sugar, pandan leaves and salt.
Cook until it boils and the sugar dissolves.
Add grated coconut, stir continuously until the sugar water is completely absorbed into the coconut.
Recipe from http://juliyanti124.blogspot.com
1 handful Bean Shoots (I use canned if out of fresh)
1 Cucumber
1 Spring onion
250 grams of Prawns or Cooked Chicken or Beef Strips (Any of the three, or you can mix them up and have a variety) if vegetarian obviously disregard this ingredient
1 Tomato (optional)
1 bunch of Coriander
1 packet Rice Paper
To save time you can buy buy ready cooked prawns; peeled and de-vein, slice down the middle, set aside. If not peel, de-vein and slice
Can buy a ready cooked chicken and rip into shreds, or cut chicken into strips, marinade with oyster sauce, soya sauce, garlic, honey, salt & pepper. Quickly fry for a few minutes and set aside. You can follow same method if prefer beef, fry with butter rather than oil
Boil full kettle of water, pour into large bowl, dip one rice paper into water so is wet all over and place rice paper flat onto a wet new chucks cloth or clean wet tea towel.
At one end put cucumber, wombok, tomato, shoots, coriander, noodles and meat of choice, roll over once, fold in ends and roll remaining till rice paper roll forms a cylinder shape.
There you have your first rice paper roll. mix it up with the veggies/salad add any other favourite veggies you may like, can add more than one meat as well. great for entrees and starters, even for lunch.
2 tsp soy sauce.
1 clove garlic, mashed (or about 1 teaspoon minced)
1 tsp Sriracha sauce or a chilli garlic sauce, optional for spice. (Try Our Galleys Sriracha Spice Blend, Recipe found on our Spice Blend recipe page)
1-2 tbs warm water, or more as needed.
Enjoy!
Thanks for catching our latest Blog, cheers R&K
You maybe interested in the following 🔽
The Top 10 Things you Need to have before you sail into Indonesia. You can watch it here. 👉 https://youtu.be/8WAawGntkp0
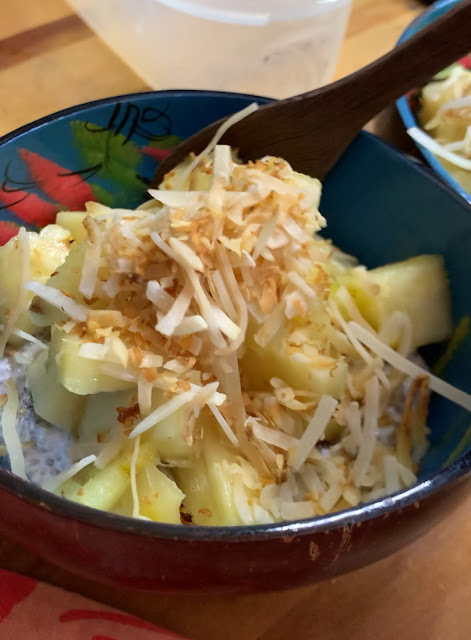
Chia Coconut Pudding - Wicked Pina Colada for Breakfast
There are so many different ways you can top off this chia pudding! Here are some of my favourite ideas:
Berries
Sliced Bananas
Cut up Mango
Coconut flakes
Nuts and seeds
Cacao nibs
Cinnamon or Coco powder
Granola
Bee pollen
But today we are topping it off with fresh pineapple chunks and toasted fresh shredded coconut.
1/4 cup chia seeds
1 & 1/4 cup coconut milk
1 tsp all spice
1 tbsp honey
Place all ingredients in a jar and shake really well. Place in fridge, for the first hour shake the jar occasionally so the chia seeds disperse evenly through the coconut milk. Leave overnight to set.
In the morning to your Chia Pudding with your favourite topping.
Enjoy!
Thanks for catching our latest Blog, cheers R&K
You maybe interested in the following 🔽
We found paradise but we may never leave as our anchor is stuck solid. You can watch it here. 👉 http://tinyurl.com/DreamtimeSailEp87
Bakso has become one of my favourite dishes to eat
We love street food dishes you can easily make at home, and Bakso is no exception. Bakso has become one of my favourite dishes to eat, even in the steaming hot weather. It is a simple Indonesian dish of meatballs and soup. Like many other dishes in Indonesia, it grew out of Asian and European influences in the country. Throughout Indonesia, there are many variations of bakso, but all of them include three main ingredients: broth, noodles, and meatballs.
What distinguishes bakso from other Asian varieties is the consistency of the meatballs, which should have a springy texture. Although bakso is essentially street food, it can be found anywhere from outdoor eateries to elegant restaurants. The garnishes, which are additionally added, are usually wontons, hard-boiled eggs, or tofu.
The dish is typically served warm with a splash of chili or soy sauce.
Ingredients
425 gr chicken fillet (I used 2 chicken breasts), cut into smaller parts
100 gr ice cubes (about 12 cubes)
1 egg white from large egg (cold, refrigerate few hours before using)
2 tsp salt
1 tbsp sugar
1/4 tsp pepper
2 tbsp fried shallots
2 tbsp fried garlic
1 tsp baking powder
100 gr tapioca flour
1.5 L water
Let’s get Cooking
Start boiling water in a large pot
Prepare a food processor and add chicken fillet, ice cubes, egg whites, salt, sugar, pepper, fried shallots, fried garlic and baking powder into the food processor bowl. Process until really smooth and form a paste (and ice cubes has melted completely and well incorporated with the chicken paste (it might take several minutes)
Add tapioca flour into the food processor bowls and process just until it mixes well with the chicken paste (don’t overmix because it will make the meatballs not chewy)
Transfer the mixture to a bowl
When the water in the pot is boiling, turn off the heat
Make small size meatballs with your hands from the chicken paste and drop them one by one into the pot
When you finish making meatballs with all the paste, cook meatballs in low heat until they float
Immediately remove the meatballs from the water and transfer them to a bowl
Let cool completely before you keep them in the freezer
Broth ingredients
3 cups chicken stock
1 spring onion chopped
2 tsp garlic
½ tsp ginger
½. celery stalk
1 lemongrass stalk whole and crushed
½ tsp sugar
Salt and pepper to taste
Garnish ideas
vermicelli noodle or if you want a quicker option two minute noodle will do.
Any green vegetables like water spinach, BokChoy
Kecap Manis
Sambal
Bean sprouts
Fried shallots
Hard boiled eggs
Tofu
Let’s get Cooking
Pop your garlic, ginger, chopped celery, crushed lemongrass, sugar, spring onion and chicken stock into a medium saucepan and bring to a boil. Continue to cook for 5 minutes before switching off the heat. Garnish with salt and pepper to taste.
3 cups chicken stock, 1 spring onion, 2 tsp garlic, ½ tsp ginger, ½ celery stalk, 1 lemongrass, ½ tsp sugar, Salt and pepper
To Serve
In a large bowl, place 4-5 meatballs and any accompaniments you'd like (bok choy, noodles, tofu etc) before pouring 2-3 ladles over the top. Add your favourite sauces such as sambal and kecap manis and enjoy!
Thanks for catching our latest Blog, cheers R&K
You maybe interested in the following 🔽
We found paradise but we may never leave as our anchor is stuck solid. You can watch it here. 👉 http://tinyurl.com/DreamtimeSailEp87
An Easy Focaccia Bread
An Easy Focaccia Bread, is delicious alternative to bread, a pizza type dough topped with olive oil, salt and fresh rosemary then baked to perfection.
Ingredients
FOR THE DOUGH
1/2 tsp honey
330 ml water (lukewarm)
6 grams of yeast
500 grams of bread flour
1 tsp salt
1 tbs olive oil
FOR THE TOPPING
1 tbs coarse salt
2-3 tbs olive oil
2 sprigs fresh rosemary (leaves removed) or any mix of Italian dried herbs.
Optional you can also add olives, sun dried tomatoes or and extras you may desire
Let’s get Cooking
In a small bowl add the honey and warm water (stir to combine) then sprinkle the yeast on top. Let the mixture sit for 5 minutes and then stir to combine.
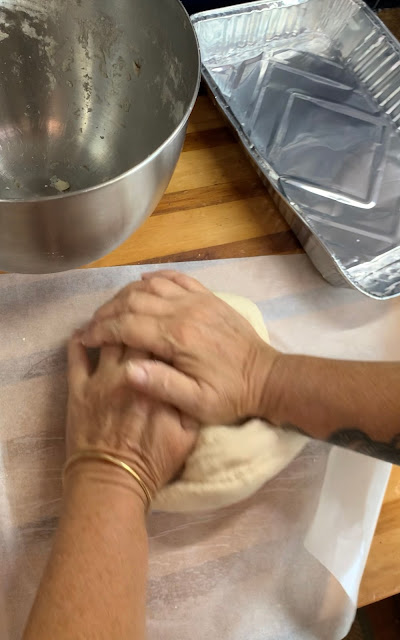
In a large bowl whisk together the flour and salt, make a well in the middle and add the yeast mixture and the olive oil, mix until almost combined then move to a lightly floured flat surface and knead until dough becomes smooth and elastic, form it into a ball.
Place the dough in a lightly olive oiled bowl (and swirl the dough so that it is lightly covered with the oil). Cover the bowl and let the dough rise 1 hour in a warm draft free area.
Remove the dough from the bowl and punch it down a few times.
Roll out the dough to approximately 2 / 3 cm thick
Place the dough in a lightly oiled rectangular tray or pizza pan, then cover it and let it rest for approximately 15 minutes.
Using your finger tips or knuckles make indentations in the dough.
Drizzle the top of the dough with 2-3 tbs of olive oil (brush the olive oil to cover the dough) then sprinkle with rock salt and herbs. Bake for approximately 15-20 minutes (check after 15 minutes). Once golden take out of oven, Serve warm.
Enjoy!
Thanks for catching our latest Blog, cheers R&K
You maybe interested in the following 🔽
We found paradise but we may never leave as our anchor is stuck solid. You can watch it here. 👉 http://tinyurl.com/DreamtimeSailEp87
Affiliate Program Statement
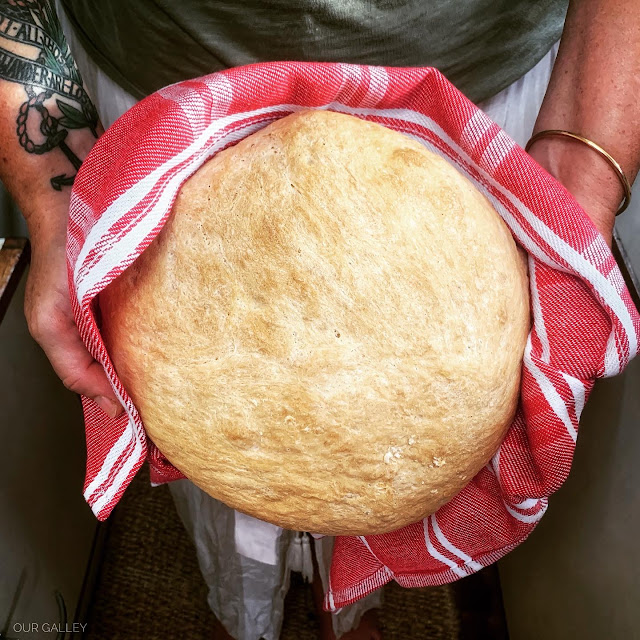
Making Bread on a Boat
Bread making doesn’t have to be complicated, there are plenty of recipes out there and even if you’ve never made homemade bread or worked with yeast before, this homemade crusty artisan bread is for you.
It’s the perfect beginner recipe and to use onboard because it only requires 4 ingredients without any special pans or mixer, there’s no kneading or complicated shaping involved, and 95% of the work is hands-off. Bread masters will appreciate this recipe too because it delivers with delicious flavour, a slightly crisp and mega chewy crust, and those signature soft holes inside like ciabatta or French bread.
Ingredients
3 and 1/4 cups (about 430g) bread flour (plus more for hands and pan)
2 teaspoons (about 6g) instant yeast
2 teaspoons (about 9g) coarse salt
1 and 1/2 cups (360ml) water, close to room temperature at about 21°C (70°F)
Let’s get Cooking
Mix the dough ingredients together. At first the dough will seem very dry and shaggy and you’ll question if it will even come together. But it will. Use a spatula at first, then switch to your hands to ensure all of the flour is moistened. The dough is actually a little sticky after it’s thoroughly mixed.
Let it rise at room temperature for 2-3 hours. Cover the dough and let it rise at room temperature out of the wind for about 2-3 hours until doubled in size.
Use right away or refrigerate. After 2-3 hours, you can immediately continue with the next step. However, for ideal flavour and texture, I strongly recommend letting the dough sit in the refrigerator for at least 12 hours and up to 3 days. Yes, 3 full days! I usually only let it rest for about 18 hours. During this crucial step, the cold air slows the fermentation process and adds so much flavour and texture. So, you can bake bread in 2-3 hours or in 3 days. The longer it sits, the better it tastes. 🙂
Shape into 2 or 1 loaves. Rest as oven preheats. You can shape the bread into a round loaf or two longer loaves. Preheat the oven to a very hot 246°C. The extremely hot air will immediately set the crust so the bread rises up instead of spreading all over. To help ensure a crispier crust, after the oven pre-heats– pour boiling water into a metal or cast iron baking pan/dish on the bottom oven rack. Immediately place the dough inside and shut the oven door to trap the steam. The steam will help create that coveted crisp crust. If you have a dutch oven, shape the dough into 1 round loaf, and bake it inside the dutch oven with the lid on.
Bake until golden brown, about 20-25 minutes. Gently tap the loaf because if they sound hollow, they’re done.
Affiliate Program Statement
The following site is Our Galley-Dreamtimesail MyStore. These are items we use on Our Dreamtime or have researched as items we think are brilliant for life onboard. Looking at these products is free. However if you purchase an item through this link we will get a small commission to help us towards our “Sailing Kitty“ dollars. We have tried to find the best prices for the quality products we use ..... who doesn’t love a bargain!
Braised beef with ginger
Saucy ginger beef is easy when made in the ShuttleChef or Oven!
Ingredients
oil
1 kg beef shin or brisket, cut into chunks
2 onions
50g ginger
3 garlic cloves
small bunch coriander
2 teaspoons Chinese five-spice powder
6 whole star anise
1 teaspoon black peppercorn
100g dark brown muscovado sugar
50ml light soy sauce
50ml dark capcay sauce
2 tablespoons tomato purée
beef stock about 1 cup
2 cups of shredded cabbage
To serve
thumb-sized chunk ginger, shredded into matchsticks
1 tbsp vegetable
cooked jasmine rice with coconut cream poured on top
Diced spring onions
Let’s get Cooking
Heat a little of the oil in a large flameproof dish. Add the beef chunks, in batches, and fry until browned. When each batch is browned, transfer the beef to another dish. Very roughly chop the onions, ginger, garlic and coriander stalks. Put in a food processor and whizz to a paste.
Add the paste with a good splash of water and gently fry, scraping up any beef bits, until the paste is fragrant and softened (add more water if the paste sticks). Stir in the five-spice, star anise and peppercorns, cook for 1 min, then add the sugar, soy sauces and tomato purée. Return the beef and any juices to the dish, then stir in enough stock to just about cover. Bring to a gentle simmer.
If using ShuttleChef: Simmer for 15 minutes. Whilst simmering prepare second pot. Bring water to boil add 1 cup of jasmine rice. Once both pots are prepared, add the rice pot to the bottom of the ShuttleChef with the meat pot on top. Close lid and cook for a minimum of 4 hours. The ShuttleChef will stay food safe for 10 hours.
If using oven: Heat oven to 160C/140C fan/gas 3. Cover the dish, put in the oven and cook for 21⁄2 hrs until the beef is really tender. Once ready cook rice as per packet instructions.
To serve: Lift the beef out of the sauce into a dish, to keep warm. Add the cabbage to the sauce. Boil the sauce until reduced by about half and thickened. Meanwhile, fry the ginger in the oil until golden and crispy. Return the beef to the sauce.
Serve the beef on the plate with the rice in a side bowl spooned over with a tablespoon of coconut cream and scattered with the crispy ginger and spring onions.
One Pan Balsamic Chicken
Ingredients
SAUCE
1/3 cup balsamic vinegar
2 tablespoons honey
2 tablespoons oil, such as avocado or olive oil
2 garlic cloves, minced
1 teaspoon Italian seasoning of your choice or check out Our Galley Herb and Spice mixes
1 tablespoon Dijon mustard
TOMATO MOZZARELLA
8 grape tomatoes, halved
8 small fresh mozzarella balls
2 tablespoons finely chopped fresh basil
CHICKEN
1 kg boneless, skinless, chicken breasts, pounded to even thickness (so they cook evenly)
2 tablespoons avocado oil or other high-heat oil
Salt and fresh black pepper
Let’s get Cooking
In a bowl, whisk together the sauce ingredients. Season with salt and pepper, to taste. Set aside.
In a separate bowl, toss together the tomatoes, mozzarella, and basil. Season with salt and pepper, to taste. Set aside.
Preheat oven to 180 degrees C.
Heat oil over medium-high heat in a large oven-safe skillet. Season the chicken all over with salt and pepper, to taste. When the pan is hot and oil is shimmering, add the chicken to the skillet in a single layer. Cook for 1-2 minutes on each side or until lightly golden brown. Add the balsamic sauce mixture. It should quickly come to a simmer. Use a wooden spoon to scrape up any brown bits from the bottom of the pan.
Immediately remove the pan from the heat and add the tomato mozzarella mixture over the chicken.
Bake uncovered for 18-23 minutes or until chicken is fully cooked through. Remove from the oven and rest for 5 minutes before serving.
Enjoy and don’t forget the wine 🍷
Baked Tuscan chicken
Ingredients
450g (2) chicken breasts, sliced horizontally
1 cup frozen chopped spinach thawed and squeezed dry
1 cup cream cheese softened
1/3 cup cream (UHT)
4 cloves garlic, minced
1/4 teaspoon salt
1/2 teaspoon onion powder
1/4 teaspoon chilli powder
1/4 teaspoon black pepper
1 teaspoon Italian seasoning
1/3 cup grated Parmesan cheese
Small jar sun dried tomatoes, drained with 1 tablespoon of oil reserved, and chopped
3/4 cup mozzarella cheese, grated
1 tablespoon fresh chopped parsley
Let’s get Cooking
Preheat your oven to 200ºC
In a bowl, whisk together the spinach, cream cheese, and heavy cream. Add half the garlic, salt, onion powder, chili powder, black pepper, and Italian seasoning and beat to combine. Add parmesan cheese and 1/2 of the mozzarella cheese and continue whisking to combine.
Lay the chicken breasts flat in the bottom of a large baking dish. Season the chicken breasts with salt, pepper and the remaining half of the garlic. Spread the spinach and cream cheese mixture on top of the chicken, top with sun-dried tomatoes then drizzle a tablespoon of oil reserved from the sun-dried tomatoes. Finish by topping the chicken with mozzarella cheese.
Bake the Tuscan chicken casserole for 35 minutes: Cook for 20 minutes loosely covered with foil then uncover and bake 15 minutes or until the chicken is cooked through. Serve the Baked Tuscan chicken casserole immediately with your choice of sides like cauliflower rice, zucchini noodles…
Enjoy!
Ingredients
1 can chickpeas, drained and rinsed
Cooking spray
1 tablespoon seasoning
Let’s get Cooking
Preheat oven to 200°
Place paper towels on a nonstick oven sheet; spread chickpeas on towels, and allow to dry for 1 hour. Remove towels from oven sheet.
Dry sheet, and coat with cooking spray. Spread chickpeas on tray, baking until crunchy, about 40-45 minutes.
Toss every 10 minutes.
Place roasted chickpeas in a medium bowl. Coat with cooking spray, and toss with your seasoning of choice.
Sweet
1 tablespoon ground cinnamon
1 tablespoon granulated sugar
2 tablespoons honey
Spicy
1 teaspoon smoked paprika
1 teaspoon granulated garlic
1/2 teaspoon salt
1 pinch cumin
Savoury
1 teaspoon za’atar
2 teaspoon ground sumac
1 teaspoon harissa powder
1/2 teaspoon garlic powder
1/2 teaspoon of fine sea salt
The spices I use in this fish recipe are slightly different from what you may usually use; still, the fish fillets are cooked in the spicy fresh tomato sauce, shakshuka-style which is a traditional North African egg dish. I decided to use mackerel here, however any firm white fish with work.
Ingredients
2 teaspoons ground coriander
2 teaspoons sumac
1 ½ teaspoon ground cumin
1 teaspoon dry dill weed
1 teaspoon turmeric
1 large yellow onion chopped
Extra virgin olive oil
8 garlic cloves, chopped
2 jalapeno peppers, chopped (or 1 green bell capsicum if you prefer mild)
5 medium ripe tomatoes, diced or chopped
3 tablespoons tomato paste
1 lime, juice of
½ cup water
salt and pepper
4 - 6 pieces of mackerel or any firm white fish
½ cup chopped fresh parsley for garnish
1 tablespoon chopped fresh mint leaves for garnish
Let’s get Cooking
In a small bowl, combine the coriander, sumac, cumin, dill and turmeric to make the spice mix. Set aside until needed
In a large, deep skillet (with a cover) heat 2 tablespoon olive oil. Saute the onions for 2 minutes then add the garlic and jalapeno. Cook on medium-high, stirring regularly, until fragrant and golden in color, about 2 more minutes.
Now add the tomatoes and only ½ of the spice mix (keeping the remainder of the spice mix for later use). Add the tomato paste, lime juice, water, salt and pepper. Stir to combine. Bring to a high simmer, then turn the heat down to medium-low. Cover and cook the tomato mixture for 10 more minutes; stir occasionally.
Meanwhile, season the fish fillets lightly with salt and pepper and coat on both sides with the remaining ½ of the spice mix.
Gently add the fish fillets to the tomato mixture, nestling the fish pieces nicely in it. Cook on medium-high briefly, then reduce the heat to medium. Cover and cook for another 10-15 minutes until the fish is cooked through (it should be flaky).
Remove from heat and top with the fresh parsley and mint leaves. Serve immediately in bowls with rice or your favourite crusty bread.
Greek Moussaka - A delicious taste of Greece
Wherever the dish originated from it is awesome! Creamy and absolutely delicious.. Greek moussaka (mousaka) is served in almost every tavern and prepared in every household on special occasions and big family meals and for good reason! The Moussaka I first became aware of was from a thousand Shirley Valentine-esque Ionian holidays. Meat, aubergines and a wobbly bechamel sauce should be the principal ingredients – but in what combination?
To prepare a traditional Greek Moussaka recipe, luscious layers of juicy minced beef (or lamb) are cooked in a tomato based sauce, layered with sweet Aubergine and creamy béchamel sauce and baked together until golden perfection.. Simply irresistible! Please don't confuse this dish as a simply cottage pie, a good moussaka is a joy to behold with cinnamon spiced lamb mingling with aubergines and a delicious creamy sauce. Winter in Australia is the perfect timing for this dish, it really is one of those comfort foods.
After three months sailing in Greece and eating in tavernas 3 times a day I have now tried my fare share of moussaka recipes ---the traditional Greek moussaka usually has about 1 teaspoon cinnamon added to the meat mixture, and you "sweat" the Aubergine slices with a bit of salt sprinkled on for 1 hour before using. These steps set the real moussaka's apart from the fakes!!
 |
| Our Greek Sails Flotilla all rafted up for a beach party at Dhokos Island. |
Our friend Michalis from Michalis Taverna in Ermionni prepares the most wonderful Moussaka in the traditional way. He serves his Moussaka at the Greek Fest night we have as our first group meal on Flotilla. The Greek feast consists of 5 starters and 4 Mains of traditional Greek dishes to be shared by 4 guests .... The Moussaka dish is always empty with guests commenting on how beautiful it is ...
 |
| Boats Med moored at Michalis Taverna ready for another Greek Feast |
The essence of this traditional Greek moussaka recipe can be summarised in four key stages: preparing the meat filling, preparing the béchamel sauce, sweating and cooking the Aubergine and layering the dish ready for baking.
Though I am not saying this recipe is as good as Michalis' and I was warned that I wouldn't be able to replicate the recipe in Australia .... Try this humble recipe and see if it will transport you back to the turquoise waters of the Greek Isles .... Kali Orexi!"
Classic Greek Eggplant Moussaka
Ingredients
Vegetables layers
3 to 4 eggplants
Salt
1.5kg potatoes
Olive oil (for greasing baking sheets)
8 large egg whites (reserving the yolks for the béchamel)
2 cups plain breadcrumbs
Meat Filling
1 1/2 pounds ground beef or lamb
2 large onions (finely diced)
2 cloves garlic (minced)
1/2 cup dry red wine
1 tsp ground cinnamon
1/4 teaspoon ground allspice
1/4 cup fresh parsley (chopped)
2 tbs tomato paste
1 cup crushed tomatoes
1 tsp sugar
Salt and freshly ground pepper to taste
For the Béchamel Sauce:
1 cup (2 sticks) unsalted butter
1 cup all-purpose flour
4 cups milk (warmed)
8 large egg yolks (lightly beaten)
Pinch of ground nutmeg
Assembly
Breadcrumbs (for the bottom of the pan)
2 cups grated Kefalotyri cheese
Serve with a fresh Greek Salad and bread rolls
Vegetables
Using a peeler, partially peel the eggplants, leaving strips of peel about 2 cm wide down the eggplant. Slice the eggplant into 3 cm slices.
Place the eggplant slices in a colander and salt them liberally. Cover them with an inverted plate and weigh down the plate with a heavy can or jar. Place the colander in the sink and let it sit for at least 15 to 20 minutes, preferably 1 hour.
Peel the potatoes, place whole in a pot, cover with cold water, and bring to a boil. Cook until they are just done, about 10 minutes. They should not get too soft, just cooked enough so that they no longer crunch. Drain, cool, and slice them into thin slices. Set aside.
Heat the oven to 180. Line two baking sheets with alfoil and lightly grease with oil.
Add a splash of water to the egg whites and beat them lightly with a fork. Place breadcrumbs on a flat plate.
Rinse the eggplant slices and dry with paper towels. Dip the eggplant slices in the beaten egg whites and then dredge them in the breadcrumbs, coating both sides.
Place breaded eggplant slices on the foil-lined baking sheets and bake for 30 minutes, turning them over once during cooking.
When eggplant is finished cooking, set aside and lower the oven temperature to 160.
Meat Filling
In a large pan, brown the ground beef until the pink colour disappears. Add onion and cook until translucent, about 5 minutes. Add garlic and cook until fragrant, about 1 minute.
Add wine to the pan and allow it to simmer and reduce a bit before adding cinnamon, allspice, parsley, tomato paste, crushed tomatoes, and sugar.
Allow the sauce to simmer, uncovered, for approximately 15 minutes so that excess liquid can evaporate. It should be a drier, chunkier sauce. Season to taste with salt and pepper.
Béchamel Sauce
In a large saucepan, melt butter over low heat. Add flour to melted butter, whisking continuously to make a smooth paste. Let the flour cook for a minute but do not allow it to brown.
Add warmed milk to mixture in a steady stream, whisking continuously. Simmer over low heat until it thickens a bit but does not boil.
Remove from heat, and stir in beaten egg yolks and pinch of nutmeg. Return to the heat and stir until sauce thickens. Set aside.
Assemble the Moussaka
Lightly grease a large deep baking pan (I use a square spring form baking pan lined with baking paper). Sprinkle the bottom of the pan with breadcrumbs.
Leaving a 1 cm space around the edges of the pan, place the potatoes in a layer on the bottom. Top with a layer of half of the eggplant slices.
Add the meat sauce on top of the eggplant layer and sprinkle with 1/4 of the grated cheese. Top with another layer of eggplant slices and potato layer and sprinkle once again with 1/4 of the grated cheese.
Pour the béchamel sauce over all, being sure to allow the sauce to fill the sides and corners of the pan. Smooth the béchamel on top with a spatula and sprinkle with remaining grated cheese.
Bake for 45 minutes or until béchamel sauce is a nice golden brown colour.
Allow it to cool for 15 to 20 minutes before slicing and serving. If you let it cool it will hold its shape.
Kali Orexi!"
Sapote Chocolate Mousse
Serves 4
Ingredients
200g Black Sapote flesh (approx 2 small Sapote)
½ tsp vanilla bean paste
1 cup coconut cream or
1 cup whipped cream
2 tbs raw cacao powder
1 tbs coconut sugar or honey (optional)
Let's get Cooking
Sapote is ripe when bright green skin dulls and they are soft to touch.
Cut Sapote in half removing seeds and fibre around seeds.
Scoop out flesh and place in mixing bowl of a small food processor.
Add vanilla bean paste, coconut cream, cacao powder, (coconut sugar / honey) and salt into the bowl with the Sapote. Using a blender stick or beaters start slow and combine, increase speed and mix/beat for approx 4 minutes until well combined and creamy and smooth.
Do not over mix as you want the mixture to be light.
Pour into serving bowls/ramekins.
Allow to chill in the fridge for about 2 hours (as best served chilled).
Top with your choice of berries for a great desert or use as a healthy breakfast alternative to yoghurt.
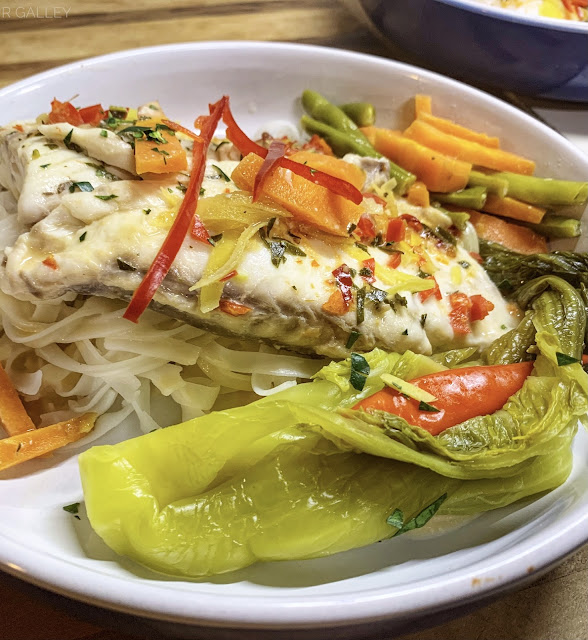
Thai Poached Nannygai
Ingredients
Serves four
4 fillets of Nannygai
Juice of 1 Lime
200mls Coconut Milk
4cm Fresh Ginger cut into thin strips
1 long red chilli 1/2 diced 1/2 cut into thin strips
3 Kaffir Lime leaves diced
2 tbs of Sweet Chilli Sauce
1 cup of carrot cut into match sticks
1 cup of green beans trimmed
Glass noodled prepared as per packet directions
Pickled Sour Mustard (optional)
Let’s get Cooking
Heat oven to 180C
Place fish in an oven proof dish with lid in one layer.
Squeeze lime over fish
Place Ginger, diced chilli, kaffir lime leaves over fish
Pour Sweet Chilli sauce over fish
Pour coconut cream around fish
Add vegetables into the coconut cream around fish
Put lid on and place in oven for 15-20 minutes
Now cook noodles as per packet directions
Plate the fish over the noodles sprinkled with extra diced kaffir lime leaves and strips of chilli. Pour the sauce over the fish and noodles adding the vegetables
Serve with Pickled Sour Mustard. Enjoy 😊
Mix all ingredients together and leave for 10-15 minutes for the seeds to soak up the water.
Give everything a good stir, then split the mixture over two lined baking trays and spread thinly. The ideal thickness is about 3-4mm. Too thin and the crackers will be very fragile, too thick and they'll be more like a seed cookie than a cracker. Using your pizza wheel cut the crackers into rectangles or squares.
Bake for one hour (switching the trays around halfway through), or until golden brown and crisp. If they don't feel crisp after an hour, return to the oven for another 5-10 minutes.
Turn the oven off but leave the crackers in and allow to cool. Store in an airtight container.
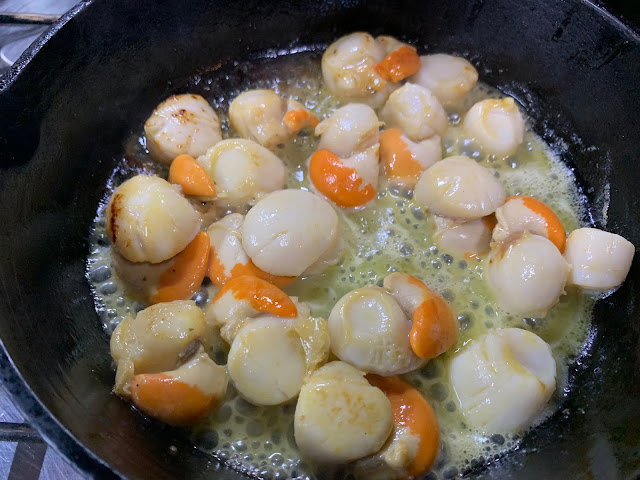
Scallops in Lemon Caper Sauce.
Transfer scallops to a clean plate and lightly season with freshly ground black pepper. Lightly cover to keep warm while making the pasta.
Affiliate Program Statement
The following site is Our Galley-Dreamtimesail MyStore. These are items we use on Our Dreamtime or have researched as items we think are brilliant for life onboard. Looking at these products is free. However if you purchase an item through this link we will get a small commission to help us towards our “Sailing Kitty“ dollars. We have tried to find the best prices for the quality products we use ..... who doesn’t love a bargain! Dreamtimesail-OurGalley MyStore














Thanks for sharing. Have you ever used a meat thermometer to cook? It is definitely a game changer.
ReplyDeleteAurora Alimentos consistently provides high-quality frozen chicken. Great flavour and ease of use without any trouble or mess. My first choice for tasty and speedy dinners.
ReplyDeleteAurora Alimentos Frozen Chicken
This recipe is very good. I will definitely try it. I am a cook in Dubai and I make food for people here. I will also cook this recipe and serve it to everyone.
ReplyDelete